
Well look who’s legal! A lot of my friends have been turning the big 2-1 in the past few years and I know finding unique gifts can be difficult. So I decided step away from the Spencer’s Gifts route and try to be a little more creative! Here are some DIY projects that I have come up with that are more out-of-the-box!
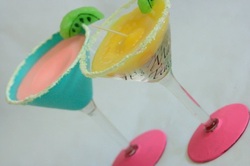
DIY Martini Candles
These are very easy to make!
You will need:
-Meltable candle wax (Michael’s)
-Meltable wax colors
-Candle Wicks (Michael’s)
-Martini Glass
-Paint & Decorations
The first things you need to do are paint and decorate your martini glass! Paint the bottom, add gems, use glitter, the sky is the limit! Next, you glue the wick to the bottom of the martini glass. There is a small metal disk that holds the wick, which makes it very easy to hot glue the wick to the glass. Next, melt the wax (directions on the package). Then mix in the wax color you desire (this will be the color of the actual drink part). Then, pour the wax into the glass evenly around the wick. I used a funnel to make sure wax doesn’t get all over the sides. Then you simply let the wax harden and that is it! I also ground up some extra hardened wax and glued it to the rim as drinking salts and carved a lime of of a green candle!
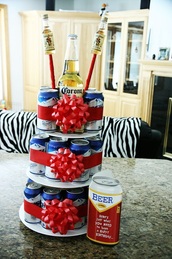
Beer and Booze Cake
What person turning 21 wouldn’t want this?!
You will need:
-Their Favorite Beer (in cans)
-Their Favorite Liquor (in mini bottles)
-Cake Circles for Stacking (Michael’s)
-Wooden Rods (Michael’s)
-Colored Ribbon (Michael's)
-Gift Bows (Dollar Store)
The first thing you need to do is glue the ribbon to the wooden rods. Then, you glue the mini liquor bottles to the ends of the rods (I use a hot glue gun for all of this). Then you stack the beer cans onto the circles just like you would cake tiers. Use the ribbon to hold the beer into place, and glue one end of the ribbon to the other end. Then, glue on gift bows. I also used a big bottle of Corona in the middle to give it more shape, but you don’t need that if you don’t want to! Finally, I stuck the rods between some of the cans to make them stick out and resemble big candles. And that’s it! A lot less messy than actually baking a cake!
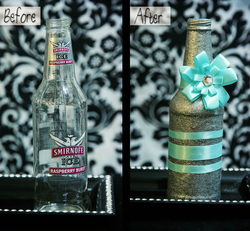
Glitter Bottle
This is one of the cheapest cute gifts ever!
You will need:
-An empty wine cooler or beer bottle
-Martha Stewart Glitter Paint (Michael’s)
-Ribbon (Michael’s)
-Gems (Michael’s)
The first thing you need to do is clean the bottle. Make sure to get all of the liquid contents out and scrub the labels off the outside. Then, apply the first layer of glitter paint. You can also mix Modge Podge with glitter and go that route also. Wait for the layer to dry, and then apply another layer. Continue this process until the bottle is covered in glitter! Once the glitter is dry, then start applying the ribbons and decorations (I used the hot glue gun and made my own little ribbon!) Then you are finished!
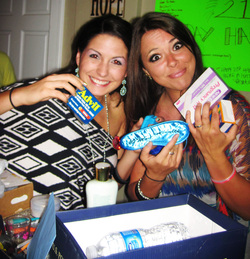
21st B-Day: Night & Next Morning Survival Kit
This is more of a gag gift, and is just all in fun!
You will need:
-An Empty Box
-A Shot Glass
-Mini Bottles of Booze
-“I’m 21” Button or Sash
-A “If Lost & Found Call xxx-xxx-xxxx” Sticker
-Band-Aids
-A Mini Bag of Pretzels/Snack
-Sleep Eye Mask
-A Water Bottle
-Mini Tube/Box of Tylenol or Advil
-A Cheap Pregnancy Test
-Bloody Mary Mix
- $5 Mcdonald’s Gift Card
This gift is more about the shopping part! You can get a lot of these things at Wal-Mart or a Dollar Store. The main thing is decorating the box. A good idea would be to wrap it in gift wrap and have a sign on top that reads “21st Birthday: Night & Next Morning Survival Kit”. Then just put the contents in the box and let the fun begin!
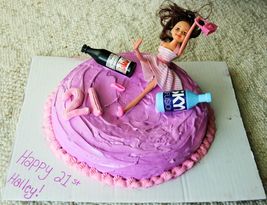
21st Birthday Stumbling Girl Cake
I made this for my friend’s 21st and love how it turned out!
You will need:
-Cake Mix
-Frosting
-A Barbie or Flexible Doll
-Barbie/Doll Drinks/Bottles
-Liquor “Labels” (I used little magazine advertisements)
-Wooden Rod
-Hot Glue Gun
First, make and frost the cake. Once the cake is secure on a transportable surface, get the doll and props ready. I found some Barbie grocery accessories that had a few bottles in them (I just simply peeled off the original labels). I then used the Skyy and Budweiser logos I found in magazines and glued them onto the bottles. Then, mess up the dolls hair and mess up her clothing a bit. I glued the clothing onto her shoulders and such so it all stayed in place. Then glue the doll to the wooden rod. Then, stick the rod into the cake until it stays in place. Then just place the bottles and props (like a falling off shoe or purse) onto the cake. Then just decorate as desired and enjoy!
Remember to always drink responsibly and only purchase the materials that contain alcohol if you are 21 or older! :)
 RSS Feed
